The Node Package Manager (usually shortened to npm) and Node.js are popular technologies among JavaScript developers. npm is the default package management utility that is installed automatically on your machine when you download and install Node.js.
npm assists in building, consuming, managing, and sharing small pieces of code. On the other hand, Node.js provides a server-side environment for creating powerful applications.
However, at times, npm can get corrupted, become incompatible with other programs, or just experience performance issues. In such cases, it may help to reinstall npm on your system and save yourself the hassles. Similarly, reinstalling Node.js may assist you in clearing out any performance errors.
And since npm is shipped with Node.js by default, installing Node.js will also install npm on your system.
How to check if reinstallation succeeded
Note that after completing the reinstallation process, you can check if it was successful by running the following commands on the terminal:
Then, if everything went well, the system will output your installed versions.
Something like this:
Since npm is usually updated more frequently than Node.js, your installation may not come with the latest npm version.
So, if your installed npm version is not the latest, you can update it by running the following command:
The above command will install the latest, stable npm version. However, if you want to experiment with things by using a version that will be released in the future, you can run the following:
If you want to update Node.js to the latest version, you can read this article.
How to reinstall npm and Node.js on Windows
If the npm or Node.js running on your Windows environment is broken, you can reinstall and get the most out of them.
You can use any of the following methods:
- Reinstalling using a Node version manager
- Reinstalling using a Node installer
Let's talk about each of them.
a) Reinstalling using a Node version manager
A Node version manager is a tool you can use to install various versions of Node.js and npm and shift between them seamlessly.
A popular Node version management tool you can use is nvm-windows. It's a powerful command line utility that allows you to manage multiple installations of Node.js comfortably.
Before installing the utility, it is recommended to remove all the existing versions of Node.js and npm from your Windows computer. This will prevent any conflict issues when installing the software.
You can uninstall them by doing the following:
- Go to the Windows Control Panel and uninstall the Node.js program.
- If any Node.js installation directories are still remaining, delete them. An example is C:\Program Files\mynodejs.
- If any npm install location is still remaining, delete it. An example is C:\Users\<username>\AppData\Roaming\npm.
Then, once your system is clean, go to this page and download and run the latest nvm-windows installer. After it has been installed, you can start the Command Prompt or Powershell as an Administrator and use the tool to reinstall Node.js and npm.
If you want to reinstall a specific Node.js version, you can run the following command:
Let's say you want to reinstall Node.js version 12.18.0, you can run:
If you want to reinstall the latest stable Node.js version, you can run:
If you want to check the list of Node.js versions available for download, you can run:
To use the installed Node.js version in your project, you can switch to it:
b) Reinstalling using a Node installer
Using the official Node installer is the easiest way to reinstall Node.js and npm on your Windows environment.
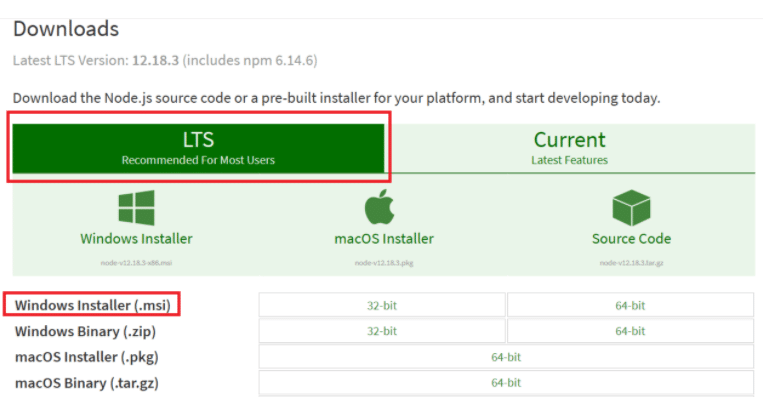
To use this option, you can go to the Node.js download page and reinstall the latest Node.js version.
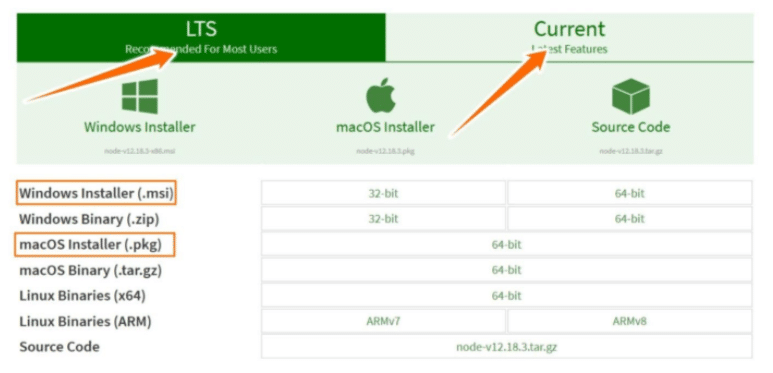
It is recommended to download the version labeled LTS (Long-term Supported) because it has been tested with npm. Although the version labeled Current comes with the latest features, it may be unstable and unreliable.

After selecting the version you want to download, and clicking the Windows Installer option, the installation wizard will magically complete the installation process for you.
Ultimately, the installer will automatically overwrite your existing, malfunctioned Node.js version with a new one.
How to reinstall npm and Node.js on macOS
Before reinstalling Node.js and npm on your macOS system, you'll need to remove any previously installed versions.
Here are some ways you can use to uninstall them:
- Manually—this involves manually removing any references of Node and npm from your system. Unfortunately, this process is difficult since there may be several directories with Node resources. For example, you may need to delete the node executable and node_modules from /usr/local/lib, delete .npm from the home directory, and delete many other directories.
- Using a script—this involves running a script to uninstall Node.js and npm automatically from your macOS system. You can find a simple script to use here.
- Using Homebrew—this package management utility lets you complete the uninstallation process fast and easily. You can run the following command:
Then, once your system is clean, you can use any of the following methods to reinstall Node.js and npm on macOS:
- Reinstalling using a Node installer
- Reinstalling using Homebrew
- Reinstalling using a Node version manager
Let's talk about each of them.
a) Reinstalling using a Node installer
To use the official Node installer for reinstalling the tools, go to the Node.js download page and select the version you want to install—just as we described previously.
Remember to choose the macOS installer option. If you run the installer, it will complete the reinstallation process for you automatically.
b) Reinstalling using Homebrew
To reinstall using Homebrew, just run the following command on the macOS terminal:
c) Reinstalling using a Node version manager
You can also reinstall the two tools using the nvm Node version manager. Since the process for using nvm is the same for both macOS and Linux, we'll describe how to use it in the next section.
How to reinstall npm and Node.js on Linux
Just like in the previous cases, you'll need to remove any installed version of Node.js and npm before reinstalling them on a Linux distribution, such as Ubuntu.
Here are some ways you can use to uninstall them:
- Using the apt package manager—you can remove Node.js by running the following command:
The above command will delete the distro-stable version while retaining the configuration files for later use. However, if you intend to remove the package as well as its configuration files, run the following:
Finally, you can delete any unused packages that were installed automatically with the deleted package:
- Using nvm—you can also use the nvm Node version manager to uninstall Node.js from your system. We'll illustrate how to do this in the next section.
Then, once your machine is clean, you can use any of the following methods to reinstall Node.js and npm on Linux:
- Reinstalling using a Node version manager
- Reinstalling using the apt package manager
Let's talk about each of them.
a) Reinstalling using a Node version manager
As earlier mentioned, you can use the nvm Node version manager to reinstall Node.js and npm on both macOS and Linux.
To install the script-based tool, you can use either Wget or cURL.
If using Wget, execute the following on the terminal:
If using cURL, execute this:
The above commands will install nvm version 0.35.0 on your system. Remember to check the latest version and refer to it accordingly on the command you want to run.
To verify if it was installed successfully, run the following:
If all went well, it would output nvm.
After installing nvm, you can use it to reinstall Node.js on your system.
Simply, execute the following command:
To reinstall a specific Node.js version, run:
For example, to reinstall Node.js version 12.18.0, execute:
Once reinstallation is complete, you can set that Node.js version for use as the system-wide default version:
Furthermore, you can check the list of Node.js versions available for download by executing the following:
To remove a Node.js version that you've set up using nvm, start by establishing if the version is currently active on your system:
If it is not actively running, execute the following to uninstall it:
On the other hand, if the version targeted for removal is the current active version, you'll need to deactivate nvm first:
Then, you can use the above uninstall command to remove it from your system.
b) Reinstalling using the apt package manager
A simpler way to reinstall Node.js and npm on a Linux distribution, such as Ubuntu, is to use the apt package manager.
To do so, you can start by refreshing your local package index:
Then, reinstall the distro-stable Node.js version from the repositories:
In most cases, this is all you need to get up and running with Node.js. Also, you may want to reinstall npm by running the following command:
Conclusion
That's how to reinstall npm and Node.js on Windows, macOS, and Linux.
After completing the reinstallation, you'll avoid any performance issues that often arise from using malfunctioned versions of the technologies.
---
---
Node.js is a popular open-source, cross-platform server-side environment for building robust applications. Since a vibrant community of contributors backs it, the platform is continuously updated to introduce new features, security patches, and other performance improvements. node –version node -v wget -qO- https://raw.githubusercontent.com/nvm-sh/nvm/v0.35.3/install.sh | bash curl -o- https://raw.githubusercontent.com/nvm-sh/nvm/v0.35.3/install.sh | bash command -v nvm nvm install node nvm install –lts nvm install <version-number> nvm install 12.18.3 nvm use 12.18.3 nvm lsnvm ls-remotenpm install -g nn <version-number>n 12.18.3 nn ltsn latestnvm install <version-number>nvm install 12.18.3nvm use 12.18.3nvm install latestnvm listnvm list availablewget https://nodejs.org/dist/v12.18.3/node-v12.18.3-linux-x64.tar.xzsudo apt-get install xz-utilstar -C /usr/local -strip-components 1 -xJf node-v12.18.3-linux-x64.tar.xzbrew install nodebrew update #ensure Homebrew is up to date firstbrew upgrade nodebrew switch node 12.18.3
So, updating to the latest Node.js version can help you to make the most of the technology. You can decide to work with the Long-term Supported (LTS) version or the Current version that comes with the latest features.
Typically, LTS is recommended for most users because it is a stable version that provides predictable update releases as well as a slower introduction of substantial changes.
In this article, you will learn how to quickly and easily update Node.js on different operating systems—macOS, Linux, and Windows.
As we'll demonstrate, there are many ways of updating to the next version of Node.js. So, you can choose the option that best meets your system requirements and preferences.
These are the updating options we'll talk about:
- Updating using a Node version manager on macOS or Linux
- Updating using a Node version manager on Windows
- Updating using a Node installer on Linux
- Updating using a Node installer on macOS and Windows
- Updating using Homebrew on macOS
Checking your version of Node.js
Before getting started, you can check the version of Node.js currently deployed on your system by running the following command on the terminal:
or (shortened method):
Let's now talk about the different ways on how to update Node.js.
1. Updating using a Node version manager on macOS or Linux
A Node version manager is a utility that lets you install different Node.js versions and switch flawlessly between them on your machine. You can also use it to update your version of Node.js.
On macOS or Linux, you can use either of the following Node version managers:
- nvm
- n
Let's talk about each of them.
a) nvm
nvm is a script-based version manager for Node.js. To install it on macOS or Linux, you can use either Wget or cURL.
For Wget, run the following command on the terminal:
For cURL, run the following:
The above commands assume that you're installing nvm version 0.35.3. So, you'll need to check the latest version before installing it on your machine.
With these commands, you can clone the repository to ~/.nvm. This way, you can make changes to your bash profile, allowing you to access nvm system-wide.
To confirm if the installation was successful, you can run the following command:
If everything went well, it'd output nvm.
Next, you can simply download and update to the latest Node.js version by running the following:
Note that node refers to an alias of the latest Node.js version.
You can also reference LTS versions in aliases as well as .nvmrc files using the notation lts/* for the most recent LTS releases.
Here is an example:
If you want to install and upgrade to a specific version, you can run the following:
For example, if you want to update Node.js to version 12.18.3, you can run:
After the upgrade, you can set that version to be the default version to use throughout your system:
You can see the list of installed Node.js versions by running this command:
Also, you can see the list of versions available for installation by running this command:
b) n
n is another useful Node version manager you can use for updating Node.js on macOS and Linux.
Since it's an npm-based package, if you already have Node.js available on your environment, you can simply install it by running this command:
Then, to download and update to your desired Node.js version, execute the following:
For example, if you want to update Node.js to version 12.18.3, you can run:
To see a list of your downloaded Node.js versions, run n on its own:
You can specify to update to the newest LTS version by running:
You can also specify to update to the latest current version by running:
You can specify to update to the newest LTS version by running:
2. Updating using a Node version manager on Windows
On Windows, you can use the following Node version manager:
- nvm-windows
Let's talk about it.
a) nvm-windows
nvm-windows is a Node version management tool for the Windows operating system. While it's not the same as nvm, both tools share several usage similarities for Node.js version management.
Before installing nvm-windows, it's recommended to uninstall any available Node.js versions from your machine. This will avoid potential conflict issues during installation.
Next, you can download and run the latest nvm-setup.zip installer.
Also, since the utility runs in an Admin shell, you'll need to begin the Command Prompt or Powershell as an Administrator before using it.
If you want to install and upgrade to a specific version, you can run the following:
You can specify to update to the newest LTS version by running:
For example, if you want to update Node.js to version 12.18.3, you can run:
After the upgrade, you can switch to that version:
You can also specify to update to the latest stable Node.js version:
You can see the list of installed Node.js versions by running this command:
Also, you can see the list of versions available for download by running this command:
3. Updating using a Node installer on Linux
Using a Node installer is the least recommended way of upgrading Node.js on Linux. Nonetheless, if it's the only route you can use, then follow the following steps:
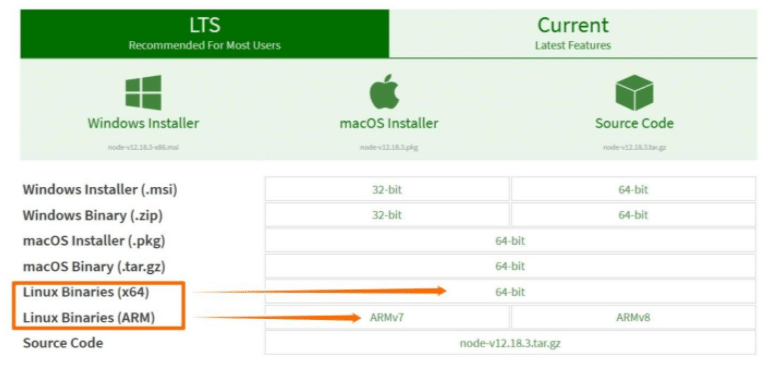
- Go to the official Node.js downloads site, which has different Linux binary packages, and select your preferred built-in installer or source code. You can choose either the LTS releases or the latest current releases.
- Download the binary package using your browser. Or, you can download it using the following Wget command on the terminal:

- Download the binary package using your browser. Or, you can download it using the following Wget command on the terminal:
Remember to change the version number on the Wget command depending on the one you want.
- Install the xz-utils utility using the following command:
This utility will be used for unpacking the binary package.
- Finally, run the following command to unpack and install the binary package on usr/local:
4. Updating using a Node installer on macOS and Windows
Another way of updating your Node.js on macOS and Windows is to go to the official download site and install the most recent version. This way, it'll overwrite your existing old version with the latest one.
You can follow the following steps to update it using this method:
- On the Node.js download page, select either the LTS version or the latest current version.

- Depending on your system, click either the Windows Installer option or the macOS installer option.
- Run the installation wizard. It will magically complete the installation process and upgrade your Node.js version by replacing it with the new, updated one.
5. Updating using Homebrew on macOS
Homebrew is a popular package management utility for macOS.
To use it for installing Node.js, run the following command on your macOS terminal:
Later, if you'd like to update it, run the following commands:
Furthermore, you can switch between installed Node.js versions:
